Azure Databricks Integration Setup
Complete guide for integrating Azure Databricks billing data with the nOps platform using Azure Storage Account and Databricks secrets.
Prerequisites
- Azure Subscription: Administrative access to create and manage storage accounts
- Azure Storage Account: Existing account or ability to create one with access keys
- Azure Databricks Workspace: Administrative access to create secrets and schedule jobs
- Azure AD Permissions: Ability to manage access keys and storage permissions
How It Works
The Azure Databricks integration follows this process:
- Storage Account Configuration - Configure Azure Storage credentials in nOps platform
- Secret Setup - One-time setup of secure secrets in Azure Databricks workspace
- Export Job Creation - Schedule daily job to export billing data to Azure Storage
- Automated Data Collection - nOps securely accesses and processes exported data
Setup Instructions
Step 1: Access nOps Integrations
- Navigate to Organization Settings → Integrations → Inform
- Find Databricks in the available integrations
- Click the + Add Databricks button to create a new integration

Step 2: Storage Account Configuration
Enter your Azure Storage Account credentials in the nOps platform:
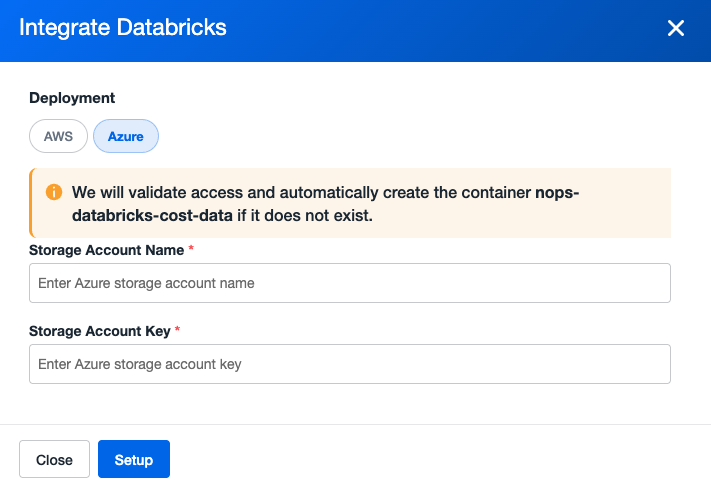
- Storage Account Name: Your Azure storage account name
- Storage Account Key: Access key for the storage account
- Click Setup to save configuration
The platform will validate access and automatically create the container nops-databricks-cost-data if it doesn't exist.
Ensure you have the correct access permissions for the storage account and that the access key is valid and active.
Step 3: Access Azure Integration
After configuring your storage account, you'll see your Azure Databricks integration listed with the Azure deployment indicator:

Notice the Azure deployment indicator and the Generate Script button that's now available.
Step 4: Setup Secrets and Export Script
Click the Generate Script button to access the complete setup instructions:
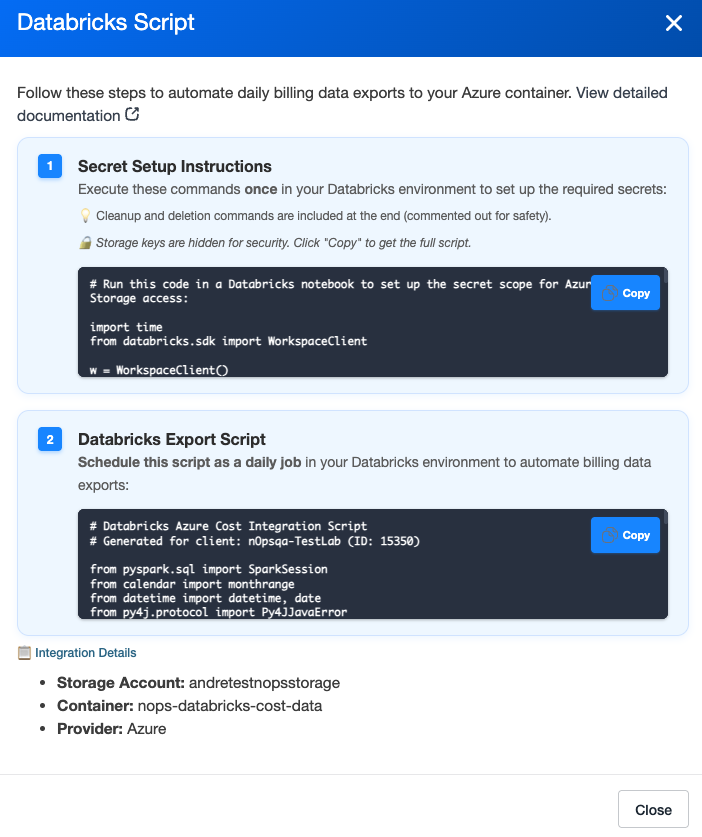
This modal provides two essential components:
4.1 Secret Setup Commands (One-Time Only)
-
Copy the Secret Setup Commands
- Use the copy button to copy the secret setup commands
- These commands create secure storage for your Azure Storage credentials
-
Execute in Azure Databricks Workspace
- Log in to your Azure Databricks workspace
- Open a new notebook or use the Databricks CLI
- Execute the provided secret setup commands in the Azure Databricks workspace
- These commands must be run within your Azure Databricks environment
The secret creation is a one-time process. Once completed, you don't need to run these commands again.
4.2 Daily Export Script
-
Copy the Export Script
- Use the copy button to copy the Python export script
- This script exports Databricks usage and billing data to your Azure Storage
-
Create Scheduled Notebook
- In your Azure Databricks workspace, navigate to Workspace → Create → Notebook
- Name your notebook (e.g.,
NopsAzureDatabricksBillingExport) - Choose Python as the language
- Paste the copied export script
-
Schedule Daily Execution
- Click Schedule in the notebook toolbar
- Set frequency to Every 1 day
- Choose an appropriate time (recommend during off-peak hours)
- Select the appropriate compute cluster
- Click Create to finalize the schedule
Step 5: Data Collection
After setup completion, nOps automatically:
- Accesses exported files from your Azure Storage Account
- Copies data to nOps secure data lake
- Processes and presents cost insights in your dashboard
It may take up to 24 hours for the first data to appear in your nOps dashboard after completing the setup.
Important Notes
Container Soft Delete Considerations
If the nops-databricks-cost-data container is accidentally deleted, it may enter a soft-deleted state (if container soft delete is enabled). During this retention period:
- Scheduled Notebook Failures: The daily export notebook will fail because it cannot access the deleted container
- Manual Restoration Required: You must manually restore the container within the retention period to resume data exports
- Permanent Deletion: After the retention period expires, the container and its contents are permanently deleted
To restore a soft-deleted container:
- Navigate to your storage account in the Azure portal
- Go to Data storage > Containers
- Enable Show deleted containers
- Select the deleted container and click Restore
Azure-Specific Features
Security & Access Control
- Access Key Authentication: Uses Azure Storage Account access keys for secure authentication
- Secret Scope Isolation: Databricks secrets stored in dedicated scopes for security
- Container-Level Access: Focused access to specific billing data container
- Encryption in Transit: All data transfers use HTTPS encryption
Container Management
- Automatic Creation: nOps creates required container structure automatically
Troubleshooting
Data Not Appearing After 24 Hours
If your billing data doesn't appear in nOps after 24 hours:
-
Check Secret Setup
- Verify that the secret setup commands were executed successfully
- Ensure no errors occurred during secret creation
-
Verify Export Job
- Check that the scheduled job is running successfully
- Review job logs for any error messages
- Confirm data is being uploaded to your storage account
-
Storage Account Access
- Verify that the storage account credentials are correct
- Ensure the access key is still valid and active
Container Deletion Recovery
If you discover the storage container has been deleted:
-
Check Soft Delete Status
- Navigate to Azure portal > Storage Account > Containers
- Enable "Show deleted containers" to view soft-deleted containers
-
Restore Container
- Select the deleted
nops-databricks-cost-datacontainer - Click "Restore" to recover the container
- Wait for restoration to complete before running the export job again
- Select the deleted
Next Steps
- Monitor Integration: Data will appear in Explorer within 24 hours
- Optimize Usage: Use nOps Explorer tools to identify optimization opportunities
- Set Alerts: Configure cost alerts and notifications for your Azure Databricks usage
For general questions about Databricks integrations, see the main Databricks Exports page.